1.What is P2.5 indoor full color LED display?
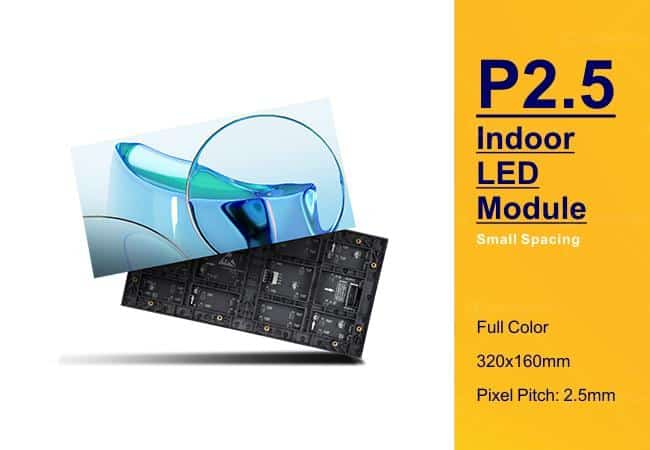
P2.5 indoor full color LED display is one of the widely used LED screen series products. Its package adopts SMD surface-mounted 2121 lamp beads three in one, mainly consists of red, green and blue three colors.
Commonly used lamp beads for 2121 model, the main process sources including Mulimori, Hongsheng, Jingtai, Xin Guangtai and Star and other brands. The number of pixel dots per square meter is 160,000 and the pitch between pixel dots is 2.5 mm.
The scanning method is usually 32 or 64 sweeps, and the power consumption of one square meter is about 500 W. Features of the P2.5 display include a novel mask design for more uniform color mixing, and high-density pixels for clearer picture quality and wider viewing angle.
2.P2.5 indoor full color LED display structure selection
P2.5 indoor full color LED display bracket is divided into two kinds of iron bracket and copper bracket.
Iron bracket is relatively cheap, commonly used in low-priced, low-end products, but easy to rust and lead to dead spots. In contrast, copper brackets are more stable but cost more.
In order to balance the quality and cost, many manufacturers have made copper brackets more competitively priced through process improvements.

3.Installation Process
3.1 Preparation stage
- Confirm the installation location: According to the layout and usage requirements of the conference room, determine the installation location of the LED screen. Make sure the wall is flat, solid and can bear the weight of the LED screen.
- Check the equipment: Confirm that all the equipment required for installation (such as LED unit board, power supply, control system) is complete, and check whether there is any damage or defect. Prepare the necessary tools, such as drill, screwdriver, wrench and level.
- Planning lines: According to the size and installation location of the LED screen, plan the direction of power lines, signal lines, etc. to ensure that the lines are safe, hidden and easy to connect.
3.2 Frame Installation
- Measurement and Positioning: Using a level and tape measure, measure and mark the installation position of the LED screen and the outline of the frame on the wall. Make sure the marking is accurate and the horizontal and vertical errors are within the allowable range.
- Installation of bezel: According to the marked position, fix the aluminum alloy or other material bezel on the wall. The frame not only supports and fixes the LED unit board, but also plays a decorative role. Drill holes in the wall, insert expansion screws or plastic expansion tubes, and then fix the bezel with screws. Ensure that the bezel is horizontal and vertical during installation.
3.3 Unit Board Installation
- Assembling unit board: LED unit board will be assembled according to the design requirements. Usually through the special connection plug-in or line connection, to ensure a solid connection.
- Fixed unit boards: Install the assembled unit boards one by one on the frame, and use a screwdriver or other tools to fix them on the slot or screw hole of the frame. Pay attention to the uniform force to avoid damage to the unit board or lead to deformation of the frame, to ensure that the gap is uniform.
3.4 Power supply and control system installation
- Installation of power supply: Select the appropriate power supply according to the power demand. Install the power supply close to the LED screen, such as on the side or below the bezel, and fix it with screws. Connect the power cable to the unit board, make sure the positive and negative poles are correct.
- Power supply requirements: P2.5 LED display using AC220V current, grid voltage fluctuations need to be less than 10%, provide a good system grounding. The power supply consists of fire, zero, ground three lines. Power less than 10kW can use single-phase voltage, more than 10kW need three-phase five-wire voltage.
- Installation of control system: The control system is the core component, controlling the display content, brightness, color and other parameters. Install the control card near the power supply or in the control box, use the row or network cable to connect the control card and the unit board, and connect the computer or other signal sources.
3.5 Line connection and organization
- Connecting lines: Connect the power, signal and control lines according to the plan, make sure the connection is firm and reliable to avoid wrong connection.
- Organize the wiring: Use cable channels or cable ties to organize the wiring, and fix or hide it in the frame. Avoid squeezing or stretching to prevent damage to the wiring.
3.6 Debugging and Testing
- Power-on test: check the power supply output voltage, start the LED screen, observe whether there is any abnormal phenomenon, if there is any problem check the line and unit board in time.
- Display test: input the test pattern and video signal through the control system, check the display effect, including clarity, color accuracy, brightness uniformity, etc..
- Adjustment parameters: adjust brightness, contrast, color and other parameters according to the test results, set the brightness mode and timing function.
3.7 Appearance inspection and cleaning
- Appearance inspection: After installation and debugging, conduct a comprehensive inspection of the appearance of the LED screen. Including whether the frame is installed firmly and flat, whether the gaps between the unit boards are uniform, and whether there are scratches, stains and other problems on the screen surface. If any abnormalities are found, they should be repaired and handled in time.
- Screen cleaning: Use a clean, soft cloth to gently wipe the surface of the LED screen to remove dust and stains. Be careful not to use detergents containing corrosive chemicals to avoid damaging the protective film on the surface of the screen. After cleaning, make sure that the screen surface is clean and tidy without any impurities remaining.
The above is the basic method and process of indoor P2.5 full-color LED screen conference room wall installation. During the installation process, be sure to strictly follow the operating specifications to ensure the quality and safety of the installation. If you are not familiar with the installation process or have questions, it is recommended to seek help from professional technicians.
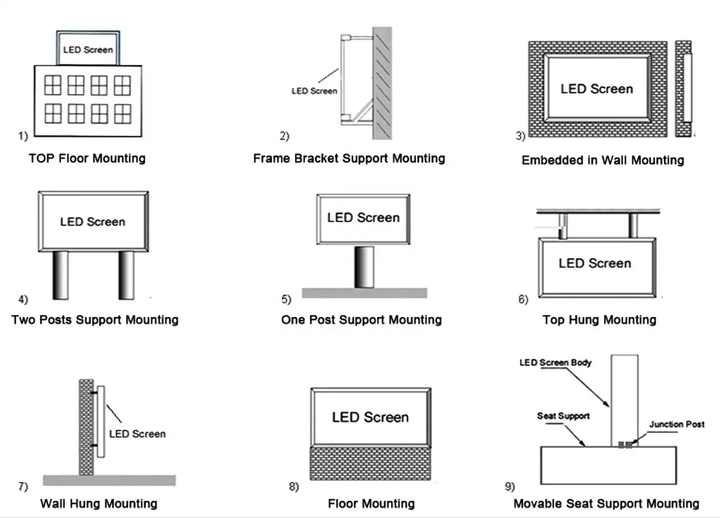
There are also some practical tips for the installation of P2.5 LED screens. In order to find a balance between beauty and cost saving, we can choose the appropriate installation method according to actual needs. The following are several common indoor P2.5 display installation methods:

1. Mosaic Installation
This method is to open a hole in the wall and completely inlay the LED screen into the wall to keep the overall beauty of the wall.
The display unit board is fixed to the frame structure by strong magnetic materials. During installation, it is necessary to ensure that the size of the hole is consistent with the size of the screen frame, and to carry out appropriate decoration.
If the wall is not ventilated, a front disassembly mechanism needs to be set. The disadvantage of inlay installation is that the heat dissipation effect is poor.
2. Suspended installation
Suitable for LED screens with a total weight of less than 50 kg and a small area, and can be directly hung on the load-bearing wall.
Standard hangers are used on concrete ceilings, and the length of the hanger is adjusted according to the site conditions.
Steel beam installation uses wire rope suspension and is decorated with steel pipes of the same color as the screen.
3. Ordinary hanging installation
Suitable for LED screens with a total weight of less than 50 kg, which can be directly hung on the load-bearing wall without reserving maintenance space.
This installation method is simple and convenient, suitable for small screens.
4. Rotating bracket installation
Applicable to LED screens with a weight greater than 50 kg and a screen height and width greater than 1200 mm.
Since the screen is large and inconvenient to disassemble and assemble, the problem of maintenance space is solved by rotating the bracket to ensure installation convenience and maintenance efficiency.
5. Floor-standing installation
It is divided into fixed and movable types.
The movable installation usually has rollers, which is suitable for LED screens with smaller areas and lighter weights, and is easy to move and adjust the position.
6. Swing arm installation
This installation method is designed to facilitate maintenance on the back of the screen and effectively solve the problem of screen heat dissipation.
The swing arm installation can customize the frame structure according to the area, weight and other parameters of the screen, and the bracket can be designed as fixed or movable.


